
I know most of you are suffering from unusually colder winds this season.
And I'm SO sorry for my friends in Canada when I write this blog.
Living in the Pacific has it's advantages for weather. But if you can't take the heat, you 'gotta' stay cool.
And air conditioning can be EXPENSIVE!!!! Averaging from $100-$500 a month in electricity bills.
So to my friends in the Pacific and in Australia....
Try making your own "PERSONAL AIR CONDITIONER"
*Sometimes called a "Red-Neck Air Con"
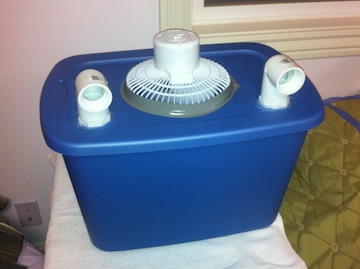
---PERSONAL AC---
*DISCLAIMER: It is important you are of appropriate age to use power tools and are experienced in using them. Always wear protection and be safe. This is not an initial design to follow, you are free to design your own way. AGAIN - This project is meant for experienced tool users. Keep in mind that the final product will require that you put frozen bottles of water or bags of Ice Pack Gels. NEVER USE STRAIGHT ICE, ice can melt and cause a risk of electrical shock. But since this is a home-made project, electrical risk are still probable. Take precaution and make sure you've covered all angles and safety regulations to prevent accidents.
_____________________________
There are MANY ways to create this but initially you need to follow a basic formula.
Materials:
-A waterproof container w/ a flat, smooth lid *(preferably 5-10 gallons, such as a styrofoam ice box or plastic bin.)
-A small desk fan *(usually small & only about 12 volts, be sure the cover and handle can come off.)
-Curved, and Male Adaptor PVC plastic tubes *(as many as you think you'll need, you can even settle for one large one.)
-Molding tape *(you need soft adhesive so you can insulate the fan.)
-Food Safe Silicon *(usually these are used for aquariums, this is for the PVC pipes.)
Optional Cooling Units for inside your waterproof container.
-Frozen Bottles of Water *Such as '32 oz. Gatorade Bottles'.
-Ice Pack Gels *Such as 'Koolit'
-Water Filled Ice Packs *Such as 'Rubbermaid'.
(NEVER USE STRAIGHT ICE - it is a risk of electrical shock when it melts.)
Tools:
-A "Rotary Tool" w/ cutters and grinder attachment.
-A sheet of "smooth" sanding paper.
-A circle template or a small plastic plate. *Make sure it is large or small enough to encircle the diameter of the fan with a bit of space to spare.
-A washable marking pen.
Protection Equipment:
-Eye Protection Goggles.
-Paint Mask to reduce inhalants.
-Gloves if necessary.
_____________________________
STEPS - Make sure you're wearing your protective gear and use all tools to their specific regulation and purposes.
1. Working on a safe work surface, remove your lid from the container.
2. Using your circle template or plastic plate, mark a circle with your pen on the lid's surface, making sure there is enough room for your PVC pipes.
*I put mine in the center, but others sometimes put theirs on the farthest side.
3. With your 'Male Adaptor' PVC pipe, mark a circle with your pen.
*Sometimes you can use an large one at the side of your lid, where as others simply cut a hole on the side of the plastic container.
4. Using your Rotary Tool "cuter" attachment, cut a semi accurate hole in each of your markings. Do not go over the line.
5. Using your Rotary Tool "grinder" attachment, scrap away the extra plastic or styrofoam.
6. Once each hold is closer to the marking, use your sand paper to smooth out the ends by hand.
7. With your 'Food Safe Silicon Tube' carefully squeeze a thick layer around the hold for your PVC pipes. Put some around your 'Male Adaptor' PVC pipe end as well.
8. Insert the PVC pipes into your desired hole.
9. While the PVC pipes dries, you can re-attach the lid onto your container.
10. Remove the top cover of your small desk fan as well as the clip-on attachment. *Leaving only the motor and back grill of the fan.
11. Using your 'Molding Tape', encircle the hold you intend to put your fan over. Some people are able to use one long sheet.
12. Place your 'Fan' onto the adhesive circle, adjusting so your fan's diameter fits within the empty space with room to spare.
13. Using the rest of your 'Molding Tape', encircle the back grill of the 'Fan'.
At this point, you're pretty much done. All you have to do is wait for the Silicon to dry and fill the container with your Cooling Units.
_____________________________
Personal AC Tips & Advantages:
-Make sure your bottles or bags are low enough so that it doesn't touch the spinning fan. Giving yourself a good 3" inches of extra space is sufficient enough.
-You can store drinks and it doubles as a cooler for food.
-You can drink the water after it melts from your bottles.
-The advantage of having a smaller container means more force of exhausted air comes out of the PVC pipes. However you cannot store as many Cooling Units if you do. Likewise if you use too large of a container, the exhaust is too low. 5-10 gallons is the idea size for your container.
-Place the Personal AC under your desk for cool feet and near reach for your drinks and sweets!
_____________________________
Hope you guys find this little project insightful. It REALLY saves money and it really works!
*This one is mine. It took about 30 minutes to make.
Cyberdevil
Nice guide. :)